
Table of Contents
Moroccan Bread: An Introduction to a Culinary and Cultural Journey
For twenty years, my passengers often asked me, “Khalid, after driving through every corner of Morocco, where can I find the best bread?” They expected me to name a famous bakery in Fes or a hidden gem in a mountain village. I would always smile and tell them the truth: the best bread I’ve ever tasted isn’t found in any shop.
The secret to truly amazing Moroccan bread isn’t something I learned on the road. It’s a memory from long before I ever had a driver’s license, a lesson that began with a familiar family argument: “Whose turn is it today?”
Among five siblings, none of us wanted the heavy task of carrying the wassla—a long, rectangular wooden board holding our family’s loaves of dough—on our heads to the neighborhood oven (ferrane). But that difficult walk was always rewarded with the most incredible taste, a taste of home that modern machines can’t replicate.
In this guide, I’m sharing that very secret with you. We’re going to bake not just a loaf, but a memory.
What is Moroccan Bread? It’s More Than Just a Loaf
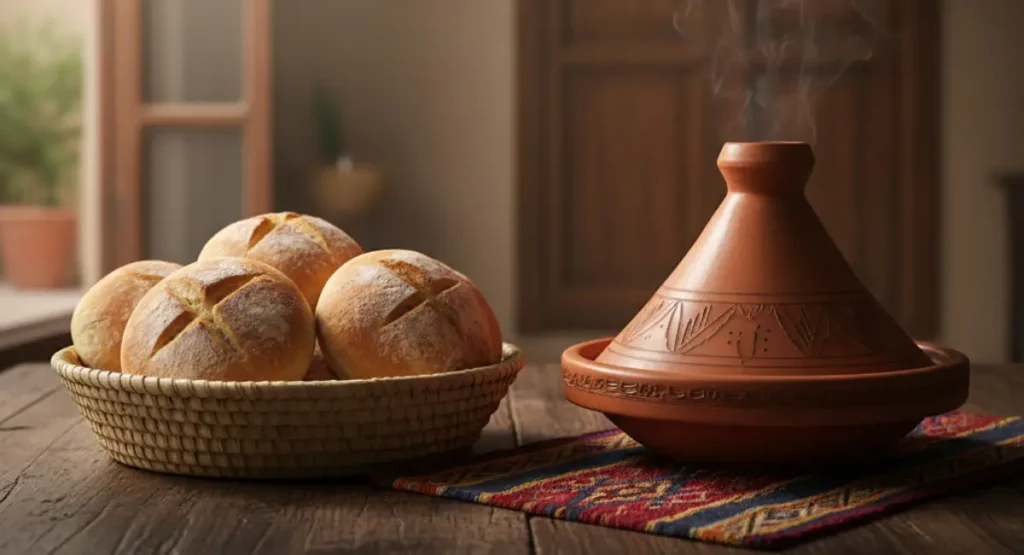
I’ve seen this happen my whole life, probably a thousand times. The mother of the house brings out the tagine, you know? It’s heavy, steam is pouring out, and she sets it down right in the middle of the table, looking so proud.
The whole room just goes quiet for a second, filled with the smell of spices. Everyone leans forward a little… but nobody moves. Not a single person reaches for anything.
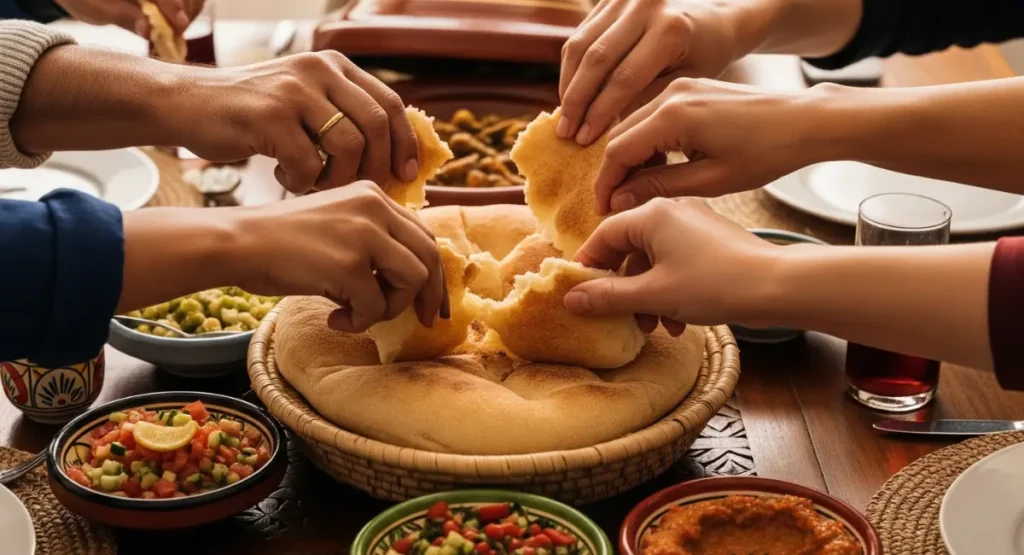
Instead, every eye scans the table for one thing: the basket of Khobz. If it’s not there, the meal simply hasn’t started. The tagine might be the king of the table, but the bread is the key to the palace. It’s our invitation to finally, truly, eat.
Now, I’ve driven countless tourists in my taxi, and when they first see our bread, they often make the same honest mistake. They’ll point and say, “Oh, you have pita here too!” I always take a moment to explain, because it’s important. A pita is a wonderful thing, but it’s an envelope. It’s a pocket, designed to be filled with other foods. Our Khobz is different.
Our bread isn’t just a container for other food. It has a real job to do. You don’t see anyone taking a knife to it, ever. You just tear a piece off. That’s the first thing you do. You feel that warmth hit your fingers, the way the inside is so soft and gives way. That piece becomes your spoon and your fork. It’s what you use to build the perfect bite, to chase that last bit of stubborn sauce, to make sure not a drop of flavor is left behind.
My mother’s Khobz was legendary in our neighborhood. People were always asking my mother for her recipe. Our friends, our neighbors… they’d try to make it themselves, but it never tasted the same. They’d come back and say, “Something’s missing!”
The secret she had wasn’t some big, complicated thing. But without it, it just wasn’t her bread. It was the generous handful of fine semolina she’d work into the white flour.
This did more than just change the texture. It changed the bread’s entire personality. It gave the crumb a beautiful, pale golden color and a slight, satisfying grit that reminded you this was real food, from the earth.
That semolina gave the bread a backbone. It stopped it from being just a soft, flimsy sponge and turned it into a sturdy, flavorful companion that could stand shoulder-to-shoulder with the most powerful tagine and not be overwhelmed. It’s not just bread; it’s a partner in the dish.
The Only Khobz Recipe You’ll Ever Need (My Mother’s Method, Perfected on the Road)
This isn’t just another recipe I picked up somewhere. This is the one. It’s the method my mother used, the one whose results filled our home with the best smell in the world.
I’ve tasted bread in hundreds of towns during my taxi years, from the northern mountains to the southern desert, and I can tell you this: while every family has its little tweak, the soul of a great Khobz comes from a few simple rules, followed with care.
This recipe holds those rules. It’s built to be forgiving if you’re a beginner, but it will give you a loaf so authentic you’ll feel like you’re sitting at our family table. So, let’s begin.
The Simple Ingredients & Tools for the Journey
Great cooking doesn’t come from a long list of fancy things. It comes from understanding the few simple things you’re working with. For our Khobz, you probably have everything you need already. But let me tell you what my mother taught me about them, because that’s where the real cooking happens.
Choosing Your Flour: This is the Heart of Your Bread
The flour you choose decides the personality of your Moroccan bread. There’s no wrong answer, really, just different roads to a delicious place.
- All-Purpose Flour: For anyone just starting out, this is your best friend. No question. You’ll get that really soft bread, the kind that squishes down when you grab it and bounces right back. It’s forgiving, you know? Even if your kneading isn’t perfect, it will still turn out nice. And for soaking up sauce, believe me, it’s a champion.
- Bread Flour: This flour has more muscle, simple as that. If you like a bread that chews back a little, this is the one. It makes a tougher dough, and the loaf you get isn’t trying to be delicate; it has a real crust on it. When you dip that into a heavy tagine sauce, it doesn’t just turn to mush. It holds its ground.
- Fine Semolina: Just a handful of this stuff… and suddenly you’re making a different bread. It’s like you’ve added a whole new personality to the dough. You see it in the color—not bright white, but a warm, sunny yellow. You feel it when you eat, a tiny bit of grit, in a good way. That’s the stuff that tastes like Morocco. In our recipe, we use both. The flour keeps it soft, but the semolina gives it its heart.
Waking Up the Yeast: Giving Your Bread Life
Now, the yeast. You have to get this part right. The water needs to feel just warm on your wrist, that’s all. If it’s cold, the yeast won’t wake up. Too hot, and it’s dead before you even start. Getting that water temperature just right is probably the most important secret to reliable baking. It’s that simple.
Give it a little sugar to eat, and then just leave it alone for a few minutes. When you come back, you need to see a layer of foam on top. That’s your proof. That tells you the yeast is awake and ready for work. No foam? Then the yeast is no good, my friend. Don’t even think about using it. That one little check will save your whole loaf from disaster.
Your Kneading Tools: The Old Way and The New Way
- By Hand (The Way of My Mother): Back then, the only machine in the kitchen was my mother’s two hands. She’d work the dough in a big clay dish we called a gassaa. This is where you feel the dough come alive. At first, it’s a sticky mess that glues itself to everything. But as you work it, it stops fighting you and starts working with you. It turns into this smooth, soft ball. It’s a good feeling, believe me.
- With a Stand Mixer (The Modern Helper): I’m not a man who says no to good tools. A stand mixer with that funny-looking dough hook is a fantastic invention. It makes a perfect dough, every time. So no, it’s not cheating. It’s just being smart. I’ll give you clear instructions for both ways.
The Step-by-Step: My Mother’s Exact Method
Okay, this is the part where you pay attention. No distractions. We’re turning that simple flour and water into real dough now.
Step 1: The Mix and the First Rest (Let the Water Do the Work)
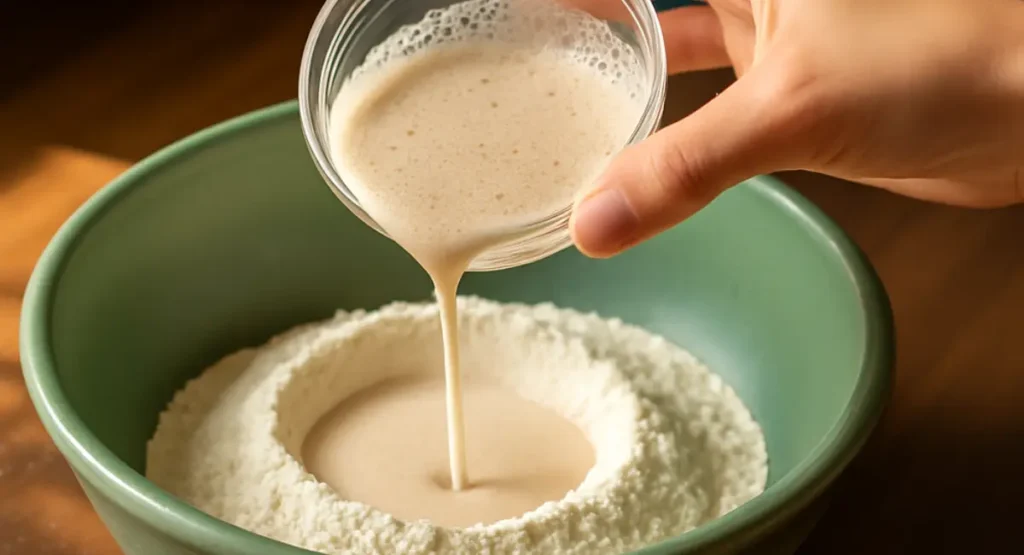
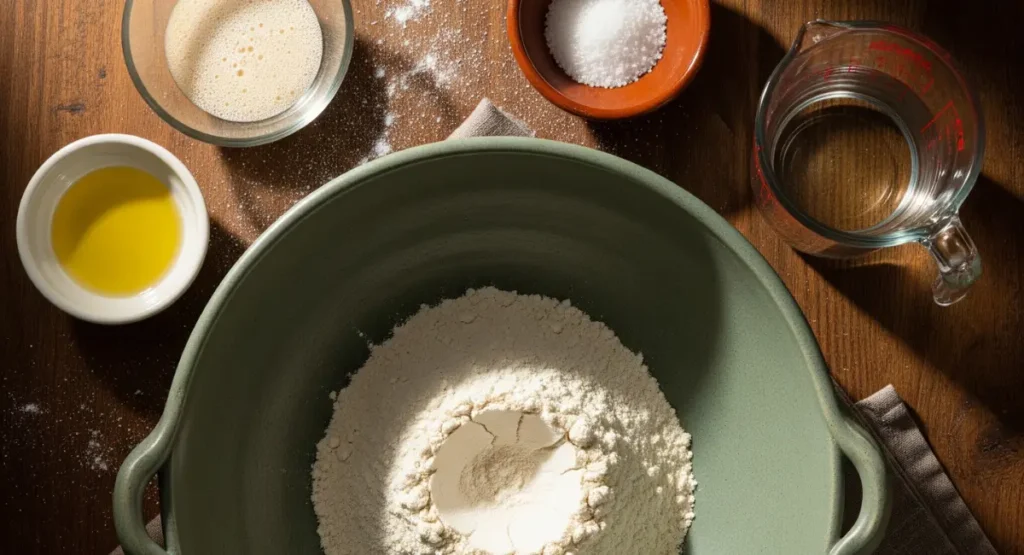
Grab your biggest bowl, or the one for your stand mixer. Dump in your flour, the semolina, and the salt. Give them a quick stir with a fork; let them get acquainted. In that other little bowl, you should have your yeast, all foamy and smelling a bit like a bakery already.
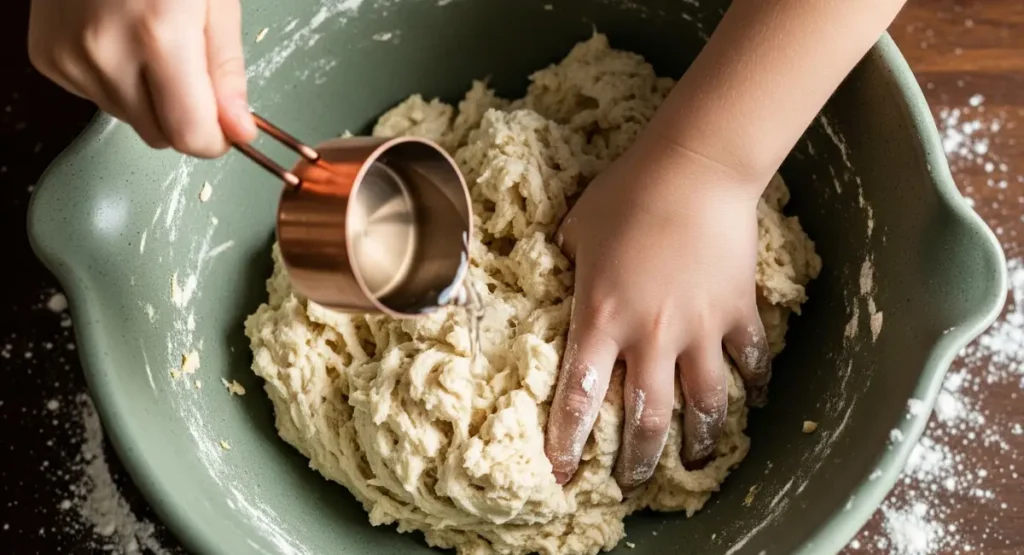
Make a little hole in the middle of your flour. Pour the yeast mix and the rest of your warm water right in there, along with a bit of oil if you’re using it. Now, with your hand or a spoon, just start mixing it all together. Don’t try to knead. Just stir until you have a shaggy, wet, sticky ball of dough and there are no dry patches left.
Now, a lot of beginners get scared here. They see this sticky mess and their first thought is, “I need more flour!” Stop right there. Don’t add any more. That stickiness is a promise. It’s telling you the bread is going to be soft and moist, not dry and hard.
Here’s a little trick I learned. Cover the bowl with a towel and just walk away for 20 minutes. That’s it. Let it sit. Basically, you’re letting the water do some of the work for you. You’ll see what I mean. When you come back to it after those 20 minutes, it won’t feel so sticky. It’s a different dough.
Step 2: Kneading (Building the Strength)
The kneading part is what makes the bread strong. If you don’t do this right, your bread won’t rise properly. It’ll be flat.
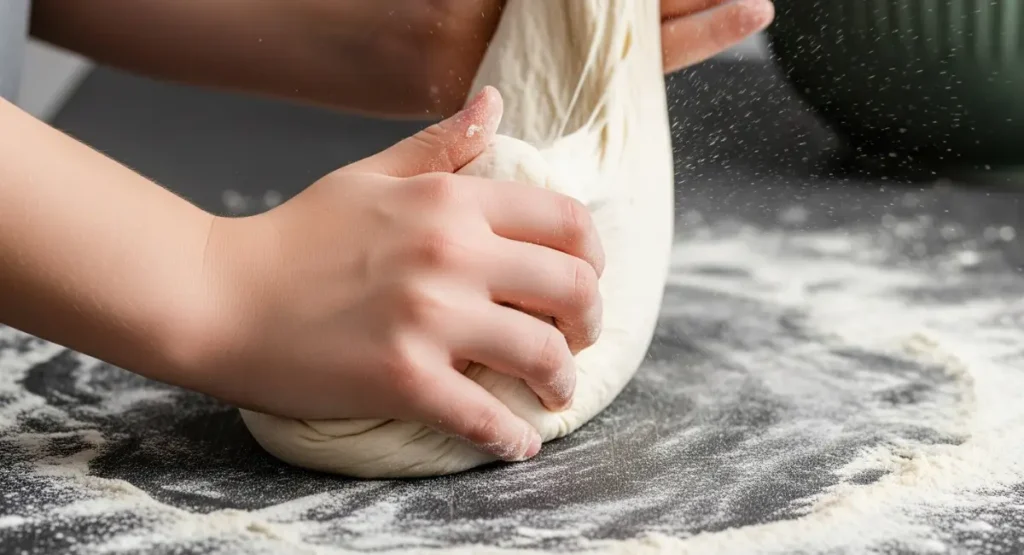
- By Hand: Put a little bit of flour on your work surface. Just enough so the dough doesn’t stick completely. Plop your dough onto it.
Now, start kneading. You push the dough forward with the bottom of your palm, then fold it in half. Turn it a bit, and do it again. That’s the rhythm.
For the first few minutes, it will want to stick to everything. Just keep going. You’ll feel the moment it changes. After about 10 minutes of this, the dough will stop being so difficult. It should feel smooth and just a little sticky, but not a mess. - With a Stand Mixer: If you’re using a mixer, just attach the dough hook. Turn the mixer on low and let it chug along for a couple of minutes until the dough comes together.
Then turn it up to medium-low. The dough will start slapping against the sides of the bowl. That’s the sound of bread being made. Let it go for 6 to 8 minutes. You’ll know it’s ready when the dough cleans the sides of the bowl itself and forms a neat ball around the hook.
Windowpane Test (The Old Baker’s Trick)
So, how do you know, really know, that you’re done kneading? Let me tell you about the windowpane test. An old baker in the Marrakech medina showed me this years ago.
Rip off a small piece of dough. Now, pull off a small piece and start to stretch it between your thumbs and fingers. You should be able to make it so thin that light comes through, without it breaking.
If it tears when you start stretching, it needs more kneading. This little test is the difference between a good bread and a great bread.
Step 3: The First Rise (Letting It Breathe)
Once your dough passes the test, shape it into a ball.
Place it in your large bowl and sprinkle the top very lightly with a pinch of flour. This will keep the dough from sticking to the towel as it rises. Now just cover the bowl with a kitchen towel.
Put the bowl somewhere warm in your house. And then you leave it alone. For at least an hour, maybe an hour and a half. You’re waiting for it to double in size.
The yeast is now working, creating the air bubbles that make the bread light. This step needs time, so just let it be. It’s like trying to make the sun rise faster. Just be patient.
Shaping the Dough and Finally, Baking
Your dough should be big and full of air now. It’s ready to be shaped into loaves. All that air took a long time to build, so be gentle with it.
Step 4: How to Divide and Shape the Dough
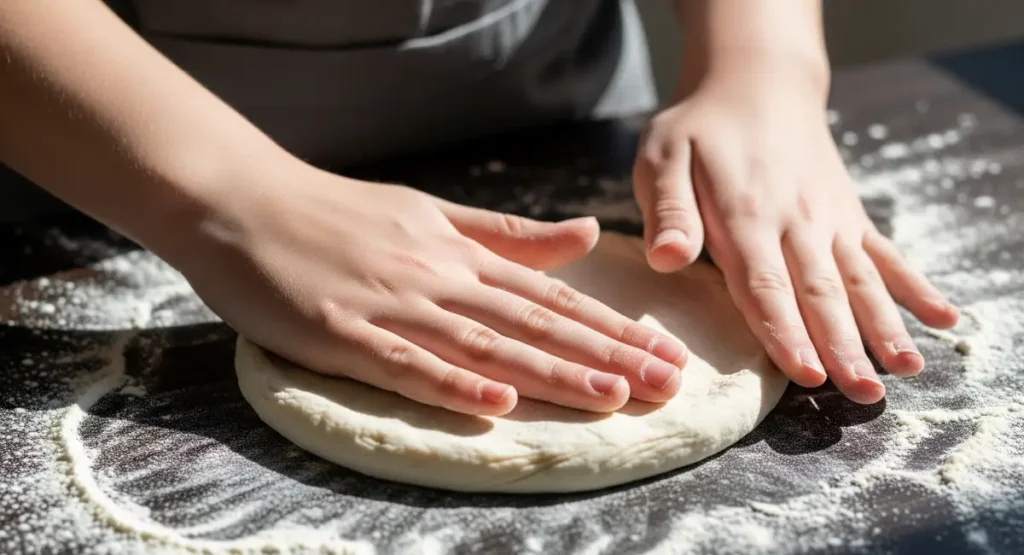
Flour your counter a little bit. Gently pull the dough out of its bowl. It’s soft, right? Now, press down on it, but not too hard. You’re just deflating it a little, pushing out the giant air bubbles.
Then, cut the dough into pieces. Two or three pieces will give you big family-style loaves. If you want smaller ones, like for individual sandwiches, cut it into four or six. Use a knife to get a clean cut.
Now, to shape each piece. Here’s a trick from an old baker in Fes that works better than just rolling it into a ball. Put the piece of dough on the counter, and cup your hand around it like you’re holding a ball. Now move your hand in circles, dragging the dough a little. You’ll feel it start to tighten up into a nice, smooth ball. Do that with all your pieces.
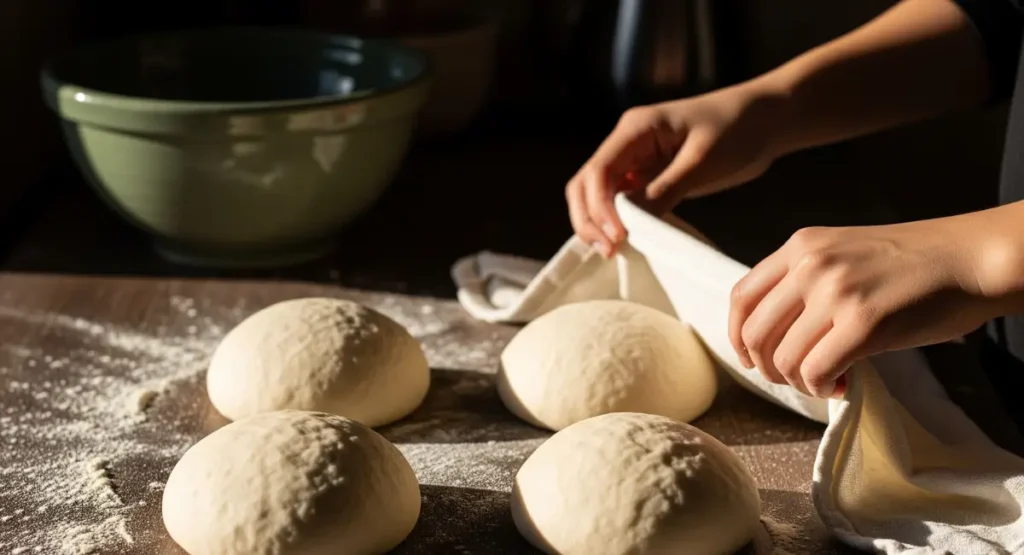
Step 5: The Second Rise (The Last Nap)
Grab your baking sheets. I like to put down parchment paper because it’s easy and there’s no cleanup. The old way is to sprinkle a lot of semolina on the sheet. This makes the bottom of the bread a little crunchy, which is very nice.
Put your dough balls on the sheets, but don’t crowd them. Give them room. Now, use your hand to flatten each ball into a circle.
How flat? Well, my mother always made them about a half-inch thick. Some people like them thicker for a fluffier inside. You decide.
Cover them up with a kitchen towel and let them sit for one last rest. This one’s shorter, maybe half an hour, 45 minutes max. This little nap lets them get puffy again before the shock of the hot oven. It makes a big difference.
Step 6: Into the Fire (Baking)
While your loaves are resting, get your oven hot. Set your oven to 425°F (220°C). And if you have a pizza stone, make sure it’s in the oven getting hot. This is a big secret for a good crust.
Once the loaves look like soft pillows, they’re ready. Take a fork and poke each one a few times on top. You have to do this. If you don’t, the steam gets trapped and you can end up with a giant balloon instead of a loaf of bread.
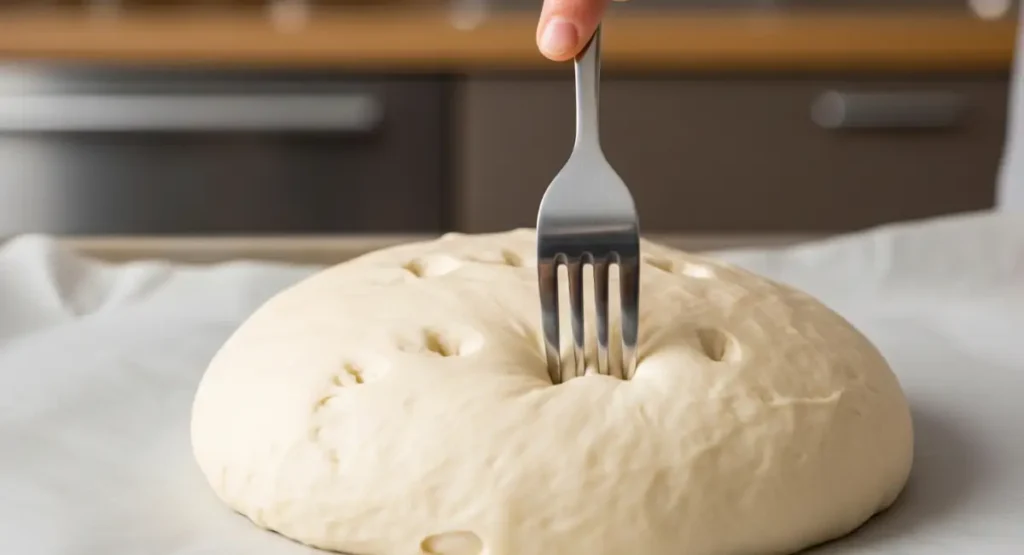
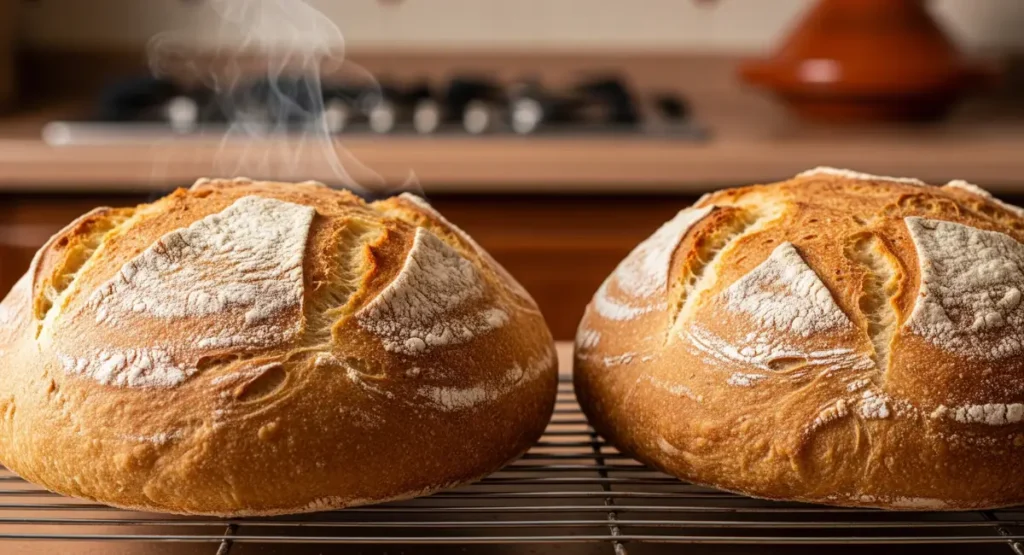
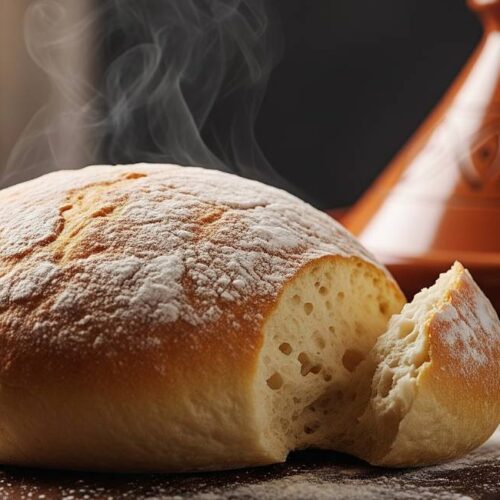
Now, get them in the oven. They will need about 15 to 20 minutes in the oven. You want them to be a nice golden-brown. But the real test is the sound. To check if a loaf is done, take it out of the oven, turn it upside down, and tap the bottom. It should sound hollow. That’s the sign.
Put them on a wire rack to cool for a few minutes. Don’t cut them right away, it’s important to wait a little. The inside is still setting. After that, tear off a piece while it’s still warm. There’s nothing better.
Khalid’s Troubleshooting Corner: Common Questions from the Road
Over the years, driving my taxi, I didn’t just share stories; I listened to them. I heard about cooking triumphs and disasters. When it comes to making bread, people usually run into the same few problems. It’s almost always a simple fix. Let’s go over the most common questions I’ve heard.
- “My bread came out hard and dense. What did I do wrong?”
This is the number one problem, my friend. A bread that’s more like a rock than a pillow. Ninety-nine percent of the time, the reason is one of two things. - “Help! My dough didn’t rise at all.”
This is a terrible feeling. You wait and wait, and nothing happens. It’s a dead dough. This problem almost always starts and ends with the yeast.- The most likely culprit is that your yeast was dead to begin with. Maybe the packet was old, or it was stored in a hot place.
This is exactly why you must do the blooming test at the beginning. If you don’t see that foam after five minutes, the yeast is no good.
Don’t be tempted to use it anyway. You’ll just be wasting your flour and your time. - Another reason could be your water temperature. If the water you used to bloom the yeast was too hot, you killed it instantly. If it was too cold, it never woke up properly.
That’s why I always tell people to think of the water temperature for a baby’s bath. It’s a good way to remember it.
- The most likely culprit is that your yeast was dead to begin with. Maybe the packet was old, or it was stored in a hot place.
- “So, how do I store this bread so it doesn’t get hard?”
Let me be honest, this Moroccan bread is at its absolute best the day you bake it. That’s when the crust has that perfect crunch and the inside is still warm and soft.
But of course, you will have leftovers. Whatever you do, don’t put it in a plastic bag on the counter right away. It will trap moisture and make the crust soft and gummy.
From the Communal Oven (Ferran) to Your Kitchen: A Story of Then and Now
Today, we worry about preheating our electric ovens to the right temperature. It’s a very quiet, private thing. When I was a boy, the whole neighborhood was involved in baking bread. It wasn’t something you did alone in your kitchen. It was a loud, public thing, and it all happened at the ferran.
We didn’t have an oven in our house. Nobody’s did. Instead, we had the ferran down the street, a huge wood-fired cavern that baked for everyone.
My mother’s job was to make the dough. Our job, as children, was the delivery.
“Whose turn is it?” she would call out, and the five of us would start our negotiations. None of us wanted the job.
You had to carry the wassla, this long, heavy wooden board my father had made. On it, my mother would stack our four big loaves, our family’s khobzat, with a clean cloth separating each layer and another one draped over the top.
The job was to put this whole thing on your head and carry it down the street, trying to keep it steady with your hands. It was heavy, believe me. And you were always afraid you were going to drop it. But when you got there, you were met by the farnatchi.
This man was a true artist. He stood in the heat and the smoke, holding a wooden peel that seemed as long as he was tall. He would take the board, and with one fast move, slide the dough off the peel and into the back of that hot, fiery oven.
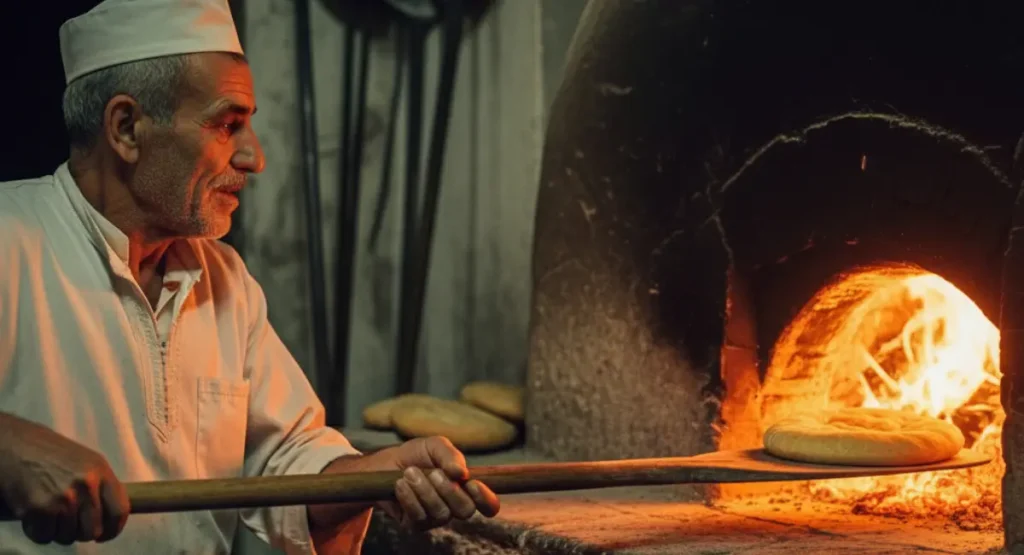
I never understood how he remembered which bread was which. He’d have dough from twenty different families in there at once, all looking the same.
But somehow, he knew. He knew which bread belonged to the Alami family, which belonged to the Tazi family, and which ones were ours. He never made a mistake.
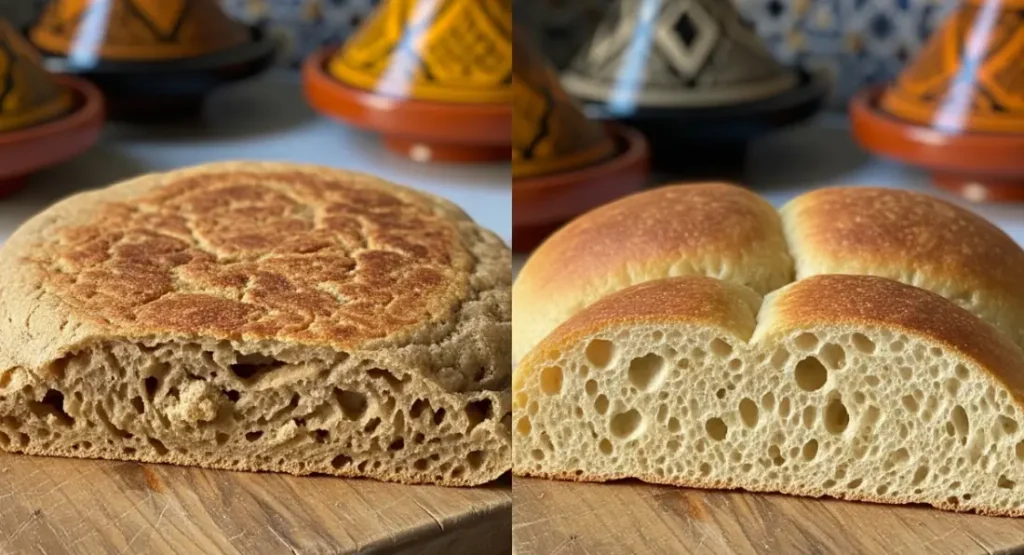
That trip to the ferran was where our Khobz was born. But other breads, like the flaky msemen or the sandy harcha, those were different.
Those were skillet breads, born at home on my mother’s stovetop. The oven was for the Khobz, the heart of this traditional Moroccan bread.
Today, you don’t see many ferrans anymore. Modern kitchens have changed everything. But that doesn’t mean the soul of that bread is lost.
So when you make this bread in your kitchen, you’re doing all the jobs at once. You’re the baker, the child making the delivery, and the farnatchi. You’re keeping that whole tradition alive yourself, and I think that’s a great thing.
How to Serve Khobz: From My Taxi to Your Table
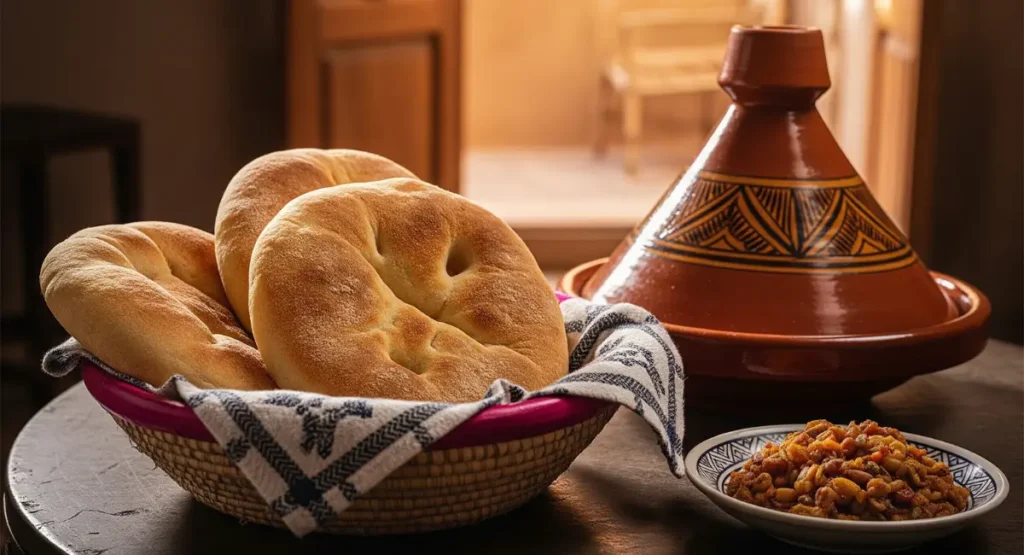
Making the bread is only half the story. The other half is eating it. In Morocco, Khobz isn’t something you just serve on the side; it’s an active part of the meal. Over the years, I’ve seen it served in a hundred different ways, but there are a few classic ways that you just can’t beat.
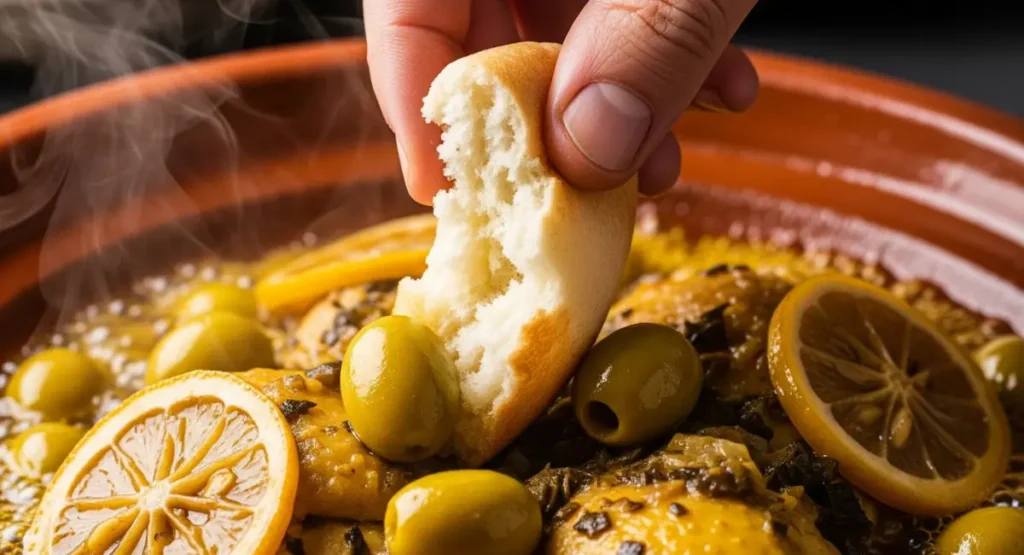
- As the Ultimate Tool for a Tagine: This is the main job of Khobz. You don’t need a fork when there’s a basket of fresh bread on the table. You tear off a piece, pinch it between your thumb and your first two fingers to make a little scoop, and you go right into the tagine with it.
You use it to pick up pieces of chicken, grab some vegetables, and most importantly, to soak up that incredible sauce. A good piece of Khobz is the best tool ever invented for making sure not a single drop of flavor is left behind on the plate.
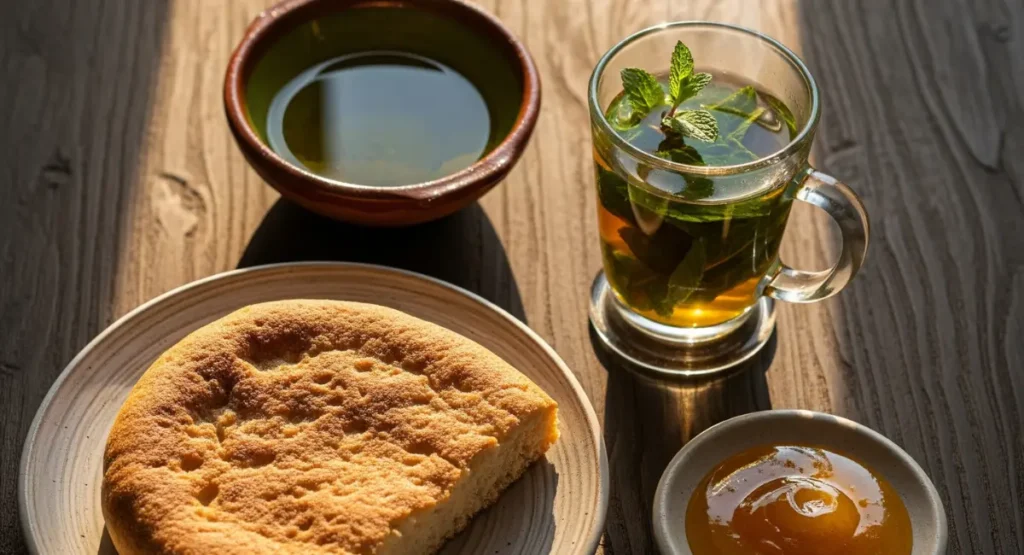
It’s also perfect for dipping into salads like Zaalouk or Taktouka. - For a Simple, Perfect Breakfast: The best breakfast in Morocco, for me, is a simple one. You take a piece of the homemade Moroccan bread you made yesterday and warm it up a little.
Then you get a little bowl of olive oil, maybe some honey, and a few pieces of soft cheese. You dip the bread, you drink your mint tea… Believe me, it’s not fancy, but it’s a breakfast that makes you feel good. It’s real food. - The Foundation of a Quick Sandwich: If you make the smaller loaves, they make the best sandwiches. You just cut one in half, and it opens up like a pocket. We would stuff it with whatever we had… leftover meat from the night before, a quick salad with tomatoes and onions, sometimes just a couple of fried eggs.
This authentic Moroccan bread is so good on its own that you don’t need much else inside. It’s a meal you can hold in your hand, and for a taxi driver, that was often exactly what I needed.
The Khobz Universe: A Preview of Your Next Baking Adventures
So, the Khobz we just baked together… that’s our main bread, the kind you bake in an oven for a tagine. But that’s not the only kind of bread in Morocco. There’s a whole other group of breads that are cooked in a pan on the stove. They have their own names and their own stories. Let me tell you about a few.
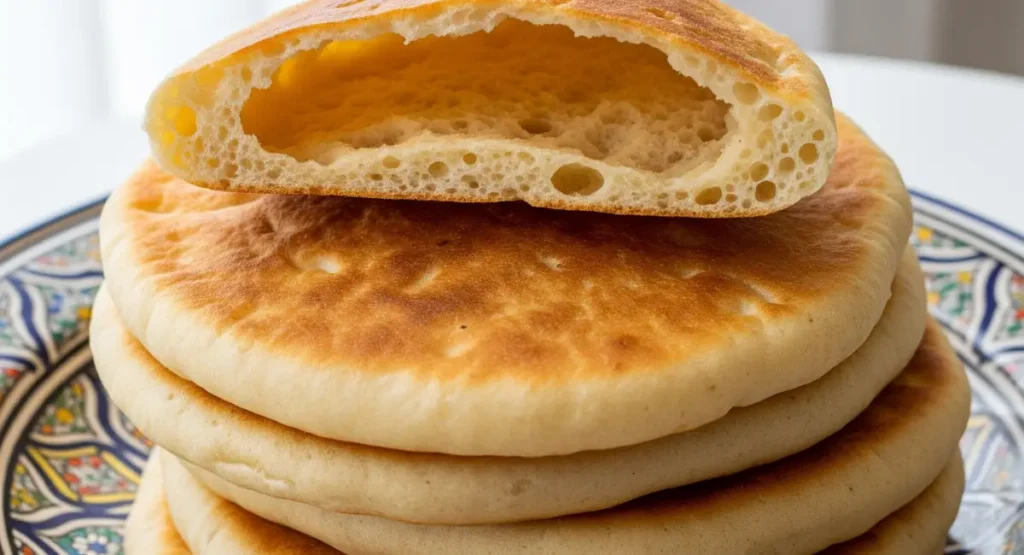
- For the Skillet: The Fluffy Batbout: The first one you should know about is Batbout. A lot of tourists think it’s a kind of pita. I can see why, because it puffs up in the pan and makes a beautiful pocket. But the texture is completely different.
A Batbout is incredibly soft, much chewier, and a little bit richer. You cook it in a heavy, dry skillet, and you have to watch it. You flip it, it starts to swell… you flip it again, and suddenly it inflates like a little balloon. It’s fantastic to watch.
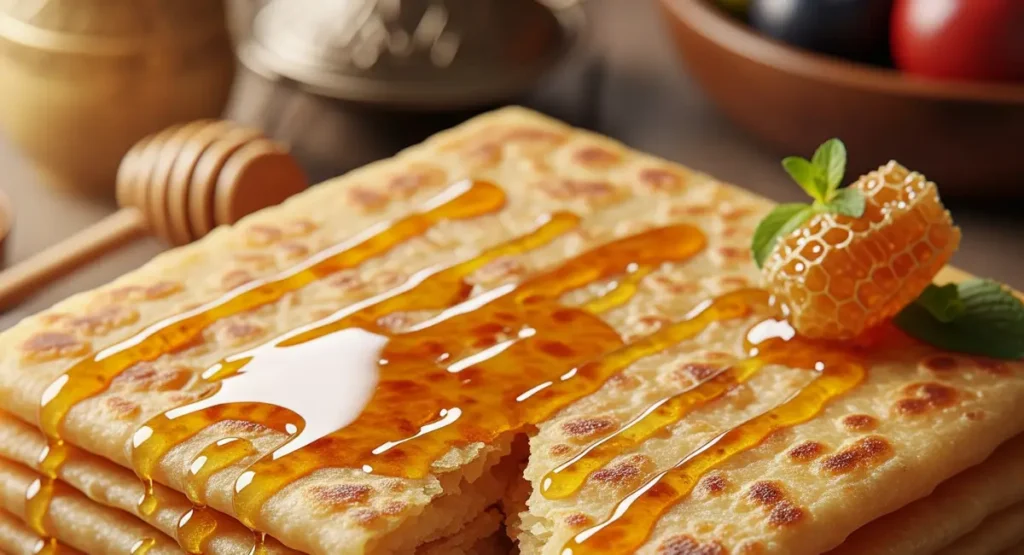
We love to split them and stuff them with tuna or minced meat salad, but for me, the best way is the simplest: fresh off the heat, torn open with a little butter melting inside. It’s a comforting kind of bread. - For a Flaky Treat: The Famous Msemen: Now, Msemen is a different beast altogether. This isn’t a loaf. It’s an experience. It’s a flat, square bread that’s made of paper-thin layers of dough.
Making it is a real process. You have to stretch the dough with oiled hands until you can almost read a newspaper through it. You fold the dough into a square, with oil and semolina between the layers.
Then you cook it in a pan. The outside gets crispy, while the inside stays soft and chewy. People often eat it for breakfast with honey and butter. - For a Rustic Bite: The Quick Harcha: Sometimes you need bread fast, and you can’t wait for the dough to rise. That’s when you make Harcha. This isn’t a light and airy bread. This one is made from semolina, so the texture is different.
It’s more dense and crumbly, a bit like cornbread. You just mix the ingredients, shape it into a circle, and cook it in a pan.
The outside gets a nice crust from the butter in the pan. It’s the kind of thing you’d have in the afternoon with a glass of mint tea and some sharp cheese or a simple jam. It’s honest, simple, and delicious.

A Few Things People Always Ask Me
When you make bread, you’re going to have questions. It’s normal. I’ve heard them all over the years, and they’re usually about the same few things. Here are my simple answers.
My bread came out hard and dense. What happened?
Ah, the bread brick. I’ve heard this one a lot. It’s almost always one of two small mistakes. Maybe you didn’t knead it long enough. The kneading is what builds the strength for the bread to hold air. Or maybe you got impatient with the rising time. If the dough doesn’t get twice as big, the yeast isn’t finished with its job. Don’t watch the clock, watch the dough. That’s the real secret.
My dough didn’t rise at all. Is it ruined?
This is a sad moment. And it’s almost always the yeast’s fault. Either it was old and dead from the start, or the water was too hot and you killed it. That’s why I tell you, you have to test it first in the warm water. If you see that foam, you’re good to go. If you see nothing, that yeast is no good. Don’t waste your flour on it.
How do I store this bread so it doesn’t get hard?
Let me be honest, this bread is best eaten the same day. But for leftovers, the old way is best: wrap it in a clean kitchen towel. It will be good for the next day. If you want to keep it longer, you have to use the freezer. And here’s a good trick: cut it up before you freeze it. That way you can just grab a piece when you want it. A few minutes in the toaster and it’s almost like new.
I don’t have semolina. Can I just use all-purpose flour?
Yes, of course. No problem. But it will be a different bread. It will be much softer and whiter, more like a simple dinner roll. It won’t have that little grainy bite from the semolina, that nice yellow color. It’s a good bread, but it’s missing that little bit of Moroccan soul, you know?
What about using whole wheat flour?
Yes, my mother did this all the time. You can swap half the all-purpose flour for whole wheat. Just know that whole wheat flour is thirsty. It drinks up more water, so you’ll probably need to add a bit more to get the dough right. The bread will be heavier, denser, with a nice nutty taste.
What’s the real difference between this Khobz and a Batbout?
That’s an easy one. One is the bread of the oven, the other is the bread of the pan. Khobz, the one we made, gets baked with dry heat, so it gets a real crust. Batbout is cooked on the stovetop in a hot pan. It doesn’t get a hard crust; it stays soft and puffs up like a pillow. It’s all about where you cook it.
Authentic Moroccan Bread (Khobz Dar)
Ingredients
For the Yeast Mixture:
- 1 packet (2 ¼ teaspoons / 7g) active dry yeast
- 1 teaspoon granulated sugar
- ¼ cup (60 ml) warm water (105-115°F / 40-46°C)
For the Dough:
- 3 cups (360g) all-purpose flour
- 1 cup (170g) fine semolina flour
- 1 ½ teaspoons salt
- 1 cup (240 ml) warm water, plus 2-3 tablespoons more if needed
- 2 tablespoons olive oil
For Finishing:
- Fine semolina for dusting the baking sheet optional
Instructions
- Activate the Yeast: In a small bowl, mix the yeast, sugar, and ¼ cup of warm water. Let it stand for 5-10 minutes. It should become foamy on top (this is called "blooming"). If it doesn't, your yeast is not active.Mix the Dough: In a large bowl or the bowl of a stand mixer, whisk together the all-purpose flour, semolina flour, and salt. Make a well in the center and pour in the foamy yeast mixture, the remaining 1 cup of warm water, and the olive oil.First Rest (Autolyse): Using your hand or a spoon, mix until a shaggy, sticky dough forms and no dry flour is visible. Cover the bowl with a towel and let it rest for 20 minutes.Knead the Dough:By Hand: On a lightly floured surface, knead the dough for 8-10 minutes. Push, fold, and turn until the dough is smooth, elastic, and only slightly tacky.With a Stand Mixer: Using the dough hook, mix on low for 2 minutes, then on medium-low for 6-8 minutes until the dough is smooth and pulls away from the sides of the bowl. Perform the "windowpane test" to check if it's ready.First Rise: Shape the dough into a ball. Place it in a large bowl, lightly dust the top with flour, and cover with a kitchen towel. Let it rise in a warm, draft-free place for 1 to 1.5 hours, or until it has doubled in size.Shape the Loaves: Gently deflate the dough and divide it into 3 equal pieces for large loaves (or 4-6 for smaller ones). Shape each piece into a tight, smooth ball.Second Rise: Place the dough balls on a baking sheet lined with parchment paper or dusted with semolina. Gently flatten each ball with your palm into a disc about a half-inch thick. Cover with a kitchen towel and let them rest for 30-45 minutes until puffy.Bake the Bread: Preheat your oven to 425°F (220°C). Just before baking, prick the top of each loaf several times with a fork. Bake for 15-20 minutes, until deep golden brown and the bottom sounds hollow when tapped.Cool: Transfer the hot loaves to a wire rack and let them cool for at least 10 minutes before tearing into them. Bessaha!
Notes
- Flour: For a chewier bread, you can substitute the all-purpose flour with bread flour.
- Whole Wheat: For a heartier loaf, replace up to half of the all-purpose flour with whole wheat flour. You may need to add a little extra water.
- Storage: Store the completely cooled bread wrapped in a kitchen towel for up to 2 days. For longer storage, freeze in a sealed bag.
Nutrition Information
Per serving (1 of 12 servings from total recipe)
| Calories | 182 kcal |
| Carbohydrates | 35 g |
| Protein | 6 g |
| Fat | 1.8 g |
| Saturated Fat | 0.3 g |
| Sodium | 292 mg |
| Fiber | 2 g |
| Sugar | 1 g |
Nutrition information is provided as a courtesy and is an estimate only. It may vary depending on the specific ingredients and brands used.
More Than Just a Recipe
And that’s it. That’s the whole method. It’s not just some recipe from a book; it’s the way my mother did it, and her mother too. The first time you pull a loaf out of your own oven, you’ll know what I’m talking about. The incredible aroma that will fill your kitchen… When that smell fills the house, everyone knows it’s time to eat. Simple as that.
I saw it a lot in my taxi. You give someone a piece of your bread, and suddenly you’re not just a driver and a passenger. You’re two people sharing a meal. Now, you have the secret to make that bread yourself.
I hope you’ll make this Khobz for your family and your friends. And when you do, please, come back and tell me about it. Leave a comment below. What did you serve it with? Who did you share it with? Your stories are now part of this journey too.
Bessaha ! (To your health!)
Share the Story of This Bread
This recipe isn’t just mine; it’s a story that belongs to my mother, to my neighborhood, and now, to you. The best stories are the ones that are shared. If you make this bread, I would be honored to see it. Take a picture and tag me on social media so I can see your beautiful Khobz. And if you think a friend or a family member would love to read this story and try this recipe, please, pass it along.
More Stories & Recipes from My Kitchen
This is just one of the many stories and recipes I’ve collected over the years. If you’d like to receive more traditional Moroccan recipes and the memories that come with them, I’ll send them straight from my kitchen to your inbox. Just put your email below.
📩 Join Our Moroccan Foodie Community
Get the best Moroccan tagine recipes and seasonal culinary tips straight to your inbox.
Ready for Your Next Culinary Journey?
This Moroccan bread is just one stop on our journey together. It’s the perfect companion for almost every dish. If you’re ready to explore what to serve with it, you can browse all my authentic recipes here. Or, if you’d like to start from the beginning, you can always return to the home page.
Your Turn: Let’s Continue the Conversation
I’ve shared my story with you, and now I would love to hear yours. The comment section below is our kitchen table. Did you try the recipe? Do you have a family bread recipe with its own special memories? What did you serve your Khobz with? I look forward to reading your stories and answering any questions you might have.